Step Eight: Condition Template Setup
Condition Templates (or Contract Templates) can be attached to any order and save you from worrying about whether or not your client has seen your terms and agreements. The Condition Template is created on the second page of the Customer Order. To modify your Condition Templates, go to: Settings > Condition Templates
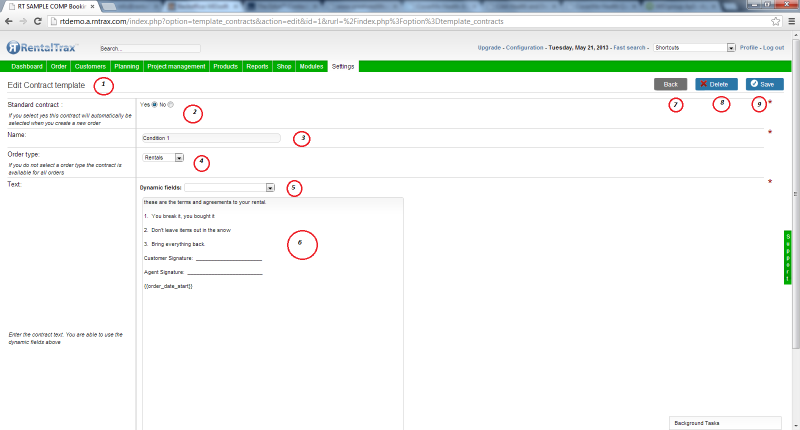
1) Edit Contract Template Title
2) Standard Contract Toggle between “Yes” and “No” to determine if this contract will be your standard contract upon order creation. You will choose which order type in step 4. If you decide that this contract will be the standard for that order type, then you will not need to select the contract to ensure that it is attached to the order. This option is best if your business only uses one rental agreement or contract.
3) Name – Give your contract a unique name that helps you to differentiate between contracts when selecting them for the order. The client will NOT see this name, so you can make it as unique as you wish.
4) Order Type – Depending on your business model, you can assign different contracts for different order types. If you select an order type using the drop down menu, that contract will only be available when creating an order for that type. If you leave the field Blank, the created contract will be available for all order types.
5) Dynamic Drop Down – As in the E-‐Mail Template creation, you can use Dynamic Fields to provide a more professional and personal touch to your contracts. The system will pull the information provided in the setup of the system to fill in the blanks where the dynamic fields are placed. Please be advised that if there is no information to retrieve, the dynamic field will be blank within the contract.
6) Contract Body Text – Enter your rental agreement text here. You can copy and paste it into this section from your previous system if that saves time. You can also use the dynamic fields to help create a more professional look to the contract. There is no max character limit for this text field, so place all of your contract text into the template.
7) Back Button – Go back to the Condition Template Directory page without saving your work.
8) Delete Button – Use this button to delete the contract template from the system. If the contract is active within the system on an order, you will not be able to delete it from your system.
9) Save Button – Save your work consistently to avoid unnecessary loss of work.