Edit Email Template
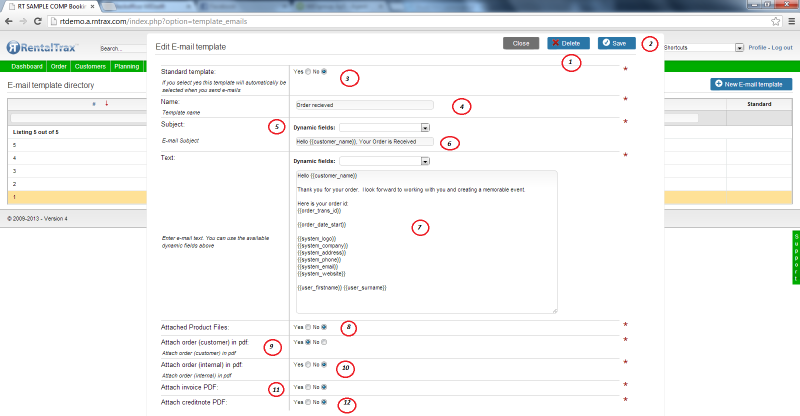
1) Delete Button Use this button to delete e-‐mail templates. This may not work if you have activated the Auto-‐mail module and are currently using this template in an active automail.
2) Save Button
3) Standard Template Toggle between Yes and No to determine whether or not this is the standard template that you will use when sending an e-‐mail to your clients. If you choose “Yes” then this template will automatically fill in when you choose to e-‐mail your clients. You will have the option to choose a different template if you desire.
4) Template Name The Template Name is an internal field that allows you to customize the name of this template so you can easily distinguish between e-‐mails. Client will NOT see
5) Dynamic Field Dropdown Dynamic Fields can give your e-‐mail a personal touch. By inserting Dynamic Fields into your subject line, e-‐mails and contracts, you can provide personal client information, company information and more that is pulled from your system setup and filled in based on the client, event and system.
6) E-‐Mail Subject Line This will be the standard e-‐mail subject line that your clients will see. You can write a limited message here and also use the dynamic fields.
7) E-‐Mail Text Body Write the main context of your e-‐mail here in the text body field. Here is where you will customize each template to include all of the information you wish the e-‐mail to contain. You can even use dynamic fields to create a signature line including logo at the bottom of the e-‐mail for a professional finish.
8) Attach Product Files If you have attached any PDF files to your products during Product Creation, then you will be able to toggle between “Yes” and “No” here to attach those PDF files to this e-‐mail template. For example: setup instructions, images of the product, etc. ** Warning: If you attach images to every product you have in your inventory, when you send an e-‐mail to your client, the likelihood of being labeled as SPAM is greatly increased if you attach the product files. For this reason, it is important to be cautious with the files you are attaching to your products. There are other places where you can attach images to send to your clients (i.e. in the order sheet).
9) Attach Order (Customer) in PDF: Toggle between “Yes” and “No” to determine whether to attach the Customer’s Order sheet as a PDF file. This is very useful when sending the client updated item lists, pricing, event/rental details, etc. This paperwork can be modified under Settings > Layout > Order Layout and will be explained later in this manual.
10) Attach Order (Internal) in PDF: Toggle between “Yes” and “No” to determine whether to attach the Internal Pick/Pull Sheet as a PDF file. The Internal paperwork is used to pick/pull items from your inventory. This paperwork can be modified under Settings > Layout > Order Layout and will be explained later in this manual.
11) Attach Invoice PDF: Toggle between “Yes” and “No” to determine whether to attach the final Invoice as a PDF file. Make sure that you have written the corresponding body of the e-‐mail to match the attached paperwork.
12) Attach Credit Note PDF: Toggle between “Yes” and “No” to determine whether to attach a Credit Note as a PDF file.